

Google Assistant on Raspberry Pi
In this article, I have mentioned all the steps which are required to install Google Assistant on our Raspberry Pi 3 board. I took the reference from Google’s Developer website to make this project and write this article. It’s a matter of 1 hour to completely make this project. So let’s begin with the things required.
Things Required
- Raspberry Pi 3B board
- USB Microphone(https://amzn.to/2sVLU7i)
- Speaker(https://amzn.to/2HE27U1)
- Aux Cable(https://amzn.to/2HCrkhI)
Installing Raspbian OS
First step is to boot up your raspberry pi board with the latest Raspbian OS which you can download it from the official website of Raspberry Pi.
Now before booting the Image into SD card, first format is using SD Card Formatter. After that I’ll recommend to use Etcher software to burn the image on SD card.
After you successfully load the image in the SD card, boot up your Pi and follow below mentioned steps.
Detecting and Testing Mic & Speaker
Before moving further, make sure mic and speaker are connected with your Raspberry Pi board.
To list down the number of recording devices connected with the pi, type this command,
arecord -lNow to list down number of playback devices attached to pi, type this command,
aplay -lNow we need to make a file with the name .asoundrc in /home/pi location. For that first type,
sudo nano .asoundrc
Now it will open editor inside the terminal. Now copy and paste below mentioned code in that file.
pcm.!default {
  type asym
  capture.pcm "mic"
  playback.pcm "speaker"
}
pcm.mic {
  type plug
  slave {
    pcm "hw:<card number>,<device number>"
  }
}
pcm.speaker {
  type plug
  slave {
    pcm "hw:<card number>,<device number>"
  }
}
In this file you need to replace the card number and device number for both mic and speaker. Now to know how to find this two numbers, kindly watch the tutorial video whose link is attached at the end of this article. Now let’s test both the devices. For testing speaker you need to write this command.
speaker-test -t wav
After executing this command, you’ll hear “Front Left Front Left” from the speaker. If not, kindly check the connections and weather you have entered right card and device number in the .asoundrc file. Now let’s test our microphone. Now we will execute this command which will allow our mic to record something.
arecord --format=S16_LE --duration=5 --rate=16000 --file-type=raw out.raw
After recording is done, we will write this command which will play whatever is recorded during the last command.
aplay --format=S16_LE --rate=16000 out.raw
Configure an Actions Console project
- Open the Actions Console. GO TO THE ACTIONS CONSOLE
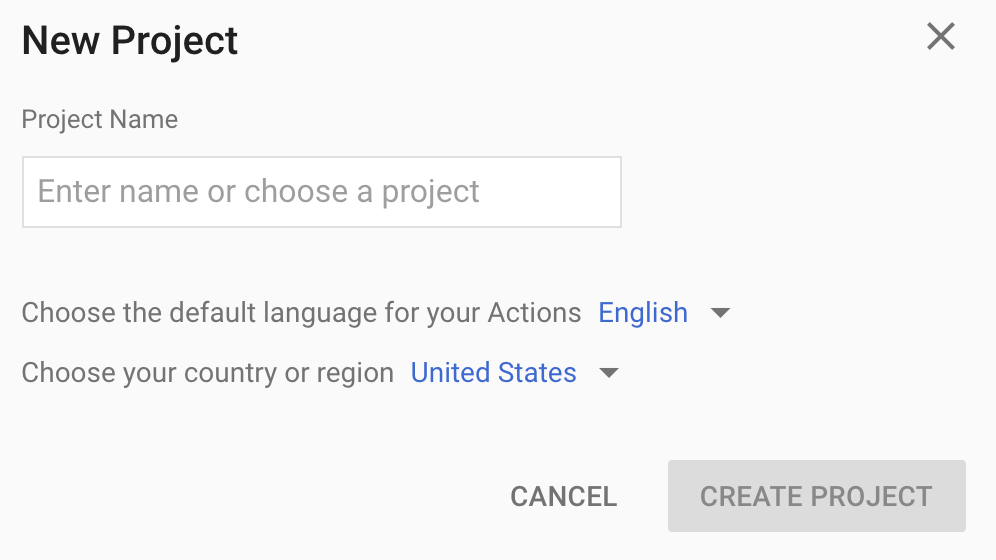
- Click on Add/import project.
- To create a new project, type a name in the Project name box and click CREATE PROJECT.If you already have an existing Google Cloud Platform project, you can select that project and import it instead.
 Keep this browser tab open and open the below mentioned link in another tab.
 - Enable the Google Assistant API on the project you selected (see the Terms of Service). You need to do this in the Cloud Platform Console.ENABLE THE APIClick Enable.
Set activity controls for your account
In order to use the Google Assistant, you must share certain activity data with Google. The Google Assistant needs this data to function properly; this is not specific to the SDK.
Open the Activity Controls page for the Google account that you want to use with the Assistant. You can use any Google account, it does not need to be your developer account.
Use the registration UI
Use the registration UI in the Actions Console to register a device model.
- Open the Actions Console. You may already have this tab open from a previous step.
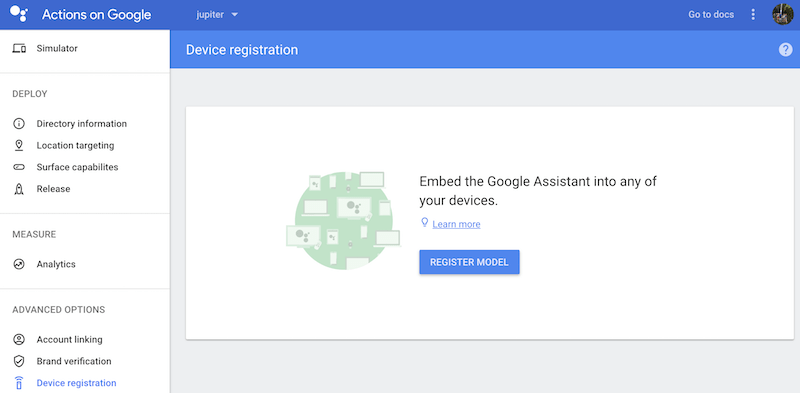
- Select the project you created or imported previously.If you created a new project, click the Device registration box. If you imported a previously-created project, this box will not be displayed; select the Device registration tab (under ADVANCED OPTIONS) from the left navbar.

- Click the REGISTER MODEL button.
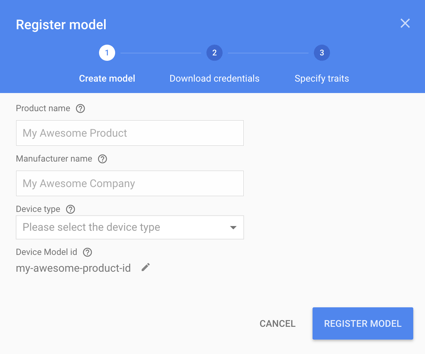
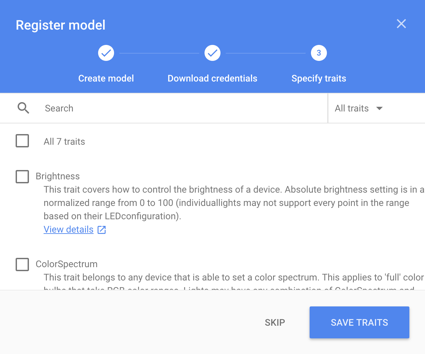
Create model
- Fill out all of the fields for your device. Select any device type, such as Light.See the device model JSON reference for more information on these fields.
- When you are finished, click REGISTER MODEL.
Download credentials file
The credentials.json file must be located on the device. This file contains a client ID and client secret, but no access token. Later, you will run an authorization tool and reference this file in order to authorize the Google Assistant SDK sample to make Google Assistant queries (see the OAuth 2.0 documentation for more information). Do not rename this file.

Later, you will specify the different abilities that your device supports on this screen. But for now, click the SKIPbutton.
sudo apt-get update
sudo apt-get install python3-dev python3-venv # Use python3.4-venv if the package cannot be found.
python3 -m venv env
env/bin/python -m pip install --upgrade pip setuptools wheel
source env/bin/activate
Get the package The Google Assistant SDK package contains all the code required to get the Google Assistant running on the device, including the sample code. Install the package’s system dependencies:
sudo apt-get install portaudio19-dev libffi-dev libssl-dev libmpg123-devUse pip to install the latest version of the Python package in the virtual environment:
python -m pip install --upgrade google-assistant-librarypython -m pip install --upgrade google-assistant-sdk[samples]Generate credentials
- Install or update the authorization tool:
python -m pip install --upgrade google-auth-oauthlib[tool]2.Generate credentials to be able to run the sample code and tools. Reference the JSON file you downloaded in a previous step; you may need to copy it the device. Do not rename this file.
google-oauthlib-tool --scope https://www.googleapis.com/auth/assistant-sdk-prototype \
          --scope https://www.googleapis.com/auth/gcm \
          --save --headless --client-secrets /home/pi/credentials.json
You should see a URL displayed in the terminal:
Please visit this URL to authorize this application: https://...3.Copy the URL and paste it into a browser (this can be done on any machine). The page will ask you to sign in to your Google account. Sign into the Google account that created the developer project in the previousstep.
4.After you approve the permission request from the API, a code will appear in your browser, such as “4/XXXX”. Copy and paste this code into the terminal:
Enter the authorization code:
If authorization was successful, you will see a response similar to the following:
credentials saved: /path/to/.config/google-oauthlib-tool/credentials.jsonIf instead you see InvalidGrantError, then an invalid code was entered. Try again, taking care to copy and paste the entire codIf authorization was successful, you will see a response similar to the following:e.

At this point, you are ready to run the sample and make a query. In the following command:
- Replace
my-dev-projectwith the Google Cloud Platform project ID for the Actions Console project you created. To find the project ID in the Actions Console, select the project, click the gear icon, and select Project settings. - Replace
my-modelwith the name of the model you created in the previous step.
googlesamples-assistant-hotword --project_id my-dev-project --device_model_id my-modelSay Ok Google or Hey Google, followed by your query. You can try some of the following:
- Who am I?
- Listen to This American Life podcast.
- What is the weather in San Francisco?
If you want to experience making this is action, watch out my full tutorial video on this, https://youtu.be/9T3MOY9GivQ