Fetching Data From Any Website using ESP8266 01

This project idea struck in my mind during the time of IPL (Indian Premier League) when we used to be in our class attending lecture and we guys are so much curious about the live status of the match. At that time I thought of a small screen on which we can get regular updates of the match. And the research begins…
Visualizing it in block diagram, first of all we need to search for a website on which we can get the live updates of whatever we want like live stock prices, current time, current temperature, YouTube views, likes and many more. Later we need to fetch the data from the server of that website and make an API (Application Program Interface). API serves the purpose of getting access to only those data which we are in need of from all the data available on the server. Suppose we need only number of views of our video uploaded on YouTube. So we need a interface which rather than requesting the whole HTML page, requests only number of views of our video. Then we will give a GET request as we want to fetch the data from the server. All these tasks will be done through Thingspeak.com. A great website for your IoT based projects.
In thingspeak.com, we will get our required API. To test the API just request the link provided by thingspeak (on the right side of the page) in your browser, then you will only get the data for what you requested.

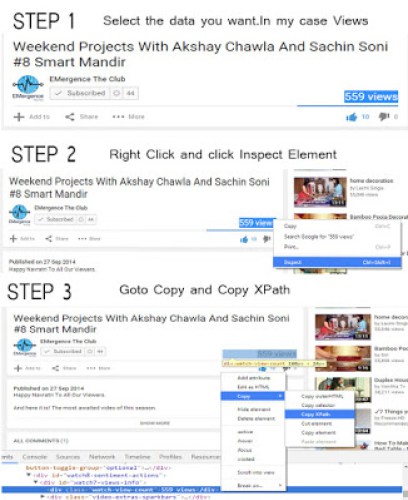
In this image, I have created an API of number of views of my YouTube video. The method I selected is GET as we want to fetch data and HTTP version is 1.0. Then I inserted the URL of the page and for the last row (Parse String) you need to follow the following steps.

Now paste that XPath into the parse string row and that’s it. Save it and the API will automatically get generated. Test it by pasting that link into your browser. Then it will show something like this.

This is all about to pick up the right data. But what if we want to make project based on this. To make this data more useful you will require Arduino, LCD and the most amazing thing ESP8266 (WiFi Module).
ESP8266 (WIFI MODULE)
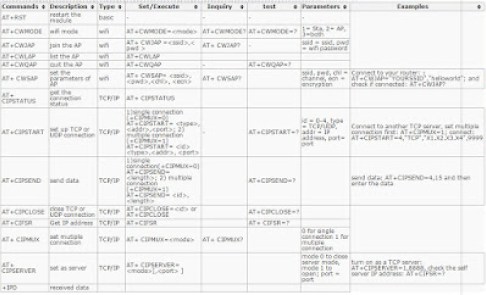
This is an absolutely amazing thing which will help your controller to communicate to the virtual world. And it is very easy to use. It has a on-chip controller and we can communicate with this WiFi Module via AT Commands. Here is the list of all AT Commands.

If you are using Arduino Mega then you can use Serial1 (RX1 and TX1) and Upload MultiSerialMega code into you board and change the baud rate to 115200 and you are ready to use WiFi Module. Just use all this AT commands once so that it will get easier to deal with this module further.
Steps for fetching data through API
Step 1
- Reset the WiFi module: AT+RST
- Set the mode to 3: AT+CWMODE=3
- Join any WiFi network: AT+CWJAP = “SSID_Name”,”SSID_Password”
Step 2
After connecting to the WiFi network, we need to establish a TCP connection to communicate with servers via port 80. To establish a connection, the AT command is:
AT+CIPSTART = “TCP”,”api<span class="hljs-selector-class">.thingspeak</span><span class="hljs-selector-class">.com</span>”,<span class="hljs-number">80</span>
In our project, we are using API generated from Thingspeak.com so we have written the host server name as api.thingspeak.com.
After this command we need to provide that how many number of characters we need to request. For this the command is:
AT+<span class="hljs-attribute">CIPSEND</span>=90
In our case the number of characters are constant, i.e. 90. Because different APIs from thingspeak.com will have different API key rest of all the things will remain same.
Step 3
After that we need to request the API generated from thingspeak.com. As we want to get the data from the server, we will send a GET request. And the sequence goes like:
<span class="hljs-builtin-name">GET</span> /apps/thinghttp/send_request?<span class="hljs-attribute">api_key</span>=XXXXXXXXXXXXXXXX
Host: api.thingspeak.com
So whenever you make a new API, just change the key and leave rest of the things as it is.
Step 4
After following all the three steps, you will get the data in response. But many times the we need to filter the required data from the response we get. So for that we need to filter the required data form the response. And this can be done easily through some of the commands of String which I have mentioned in the code.
This is all you need to know if you want to fetch the data from internet and use it further for your project. I have made one sample project so that it becomes easier for you to understand the whole concept. This is the same project on which I have recorded the video, i.e. fetching data from website and display it on your touchscreen.
If you don’t have touchscreen module, just filter out the required data and analyse the response from the server on your serial monitor.
If the concept is still not cleared, then have a look to my video tutorial for this whole procedure. And I have also shared the Arduino code for the same.
Circuit Diagram
The connection of ESP8266 with Arduino are like this, and the touchscreen I am using actually has a shield available for Arduino. You can buy the shield from here.


